
chris
Top Contributor
This article was written by DNTrade member @johno69 (Paul), the founder and project manager at Illawarra Web Design. Paul has been working in web development for over 12 years. A big thanks to Paul for sharing this!
---
Moving WordPress from One Host to Another with cPanel Access
I often get asked this question, how can I move my WordPress website from one host to another?
Generally a cPanel transfer from the old host to the new host will work for you and you can contact your new host and ask them to help with that.
There are often reasons why that is not the best way to go. Are you wanting to move a site you have set up as an addon domain but want to leave the root site where it is? that’s just one reason you will need to do this manually. So here are some steps to help.
Today i’ll go through the steps for you if you DO have cPanel access to the old server. Later I will cover how to do the same without cPanel access the the old server.
Essentially it’s just a matter of backing everything up, and moving it. Sounds easy right? Well it’s easy when you know how.
Because you are not changing the URL there are no real changes you need to make to any settings before backing up.
Step 1: Back up the files.
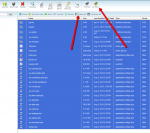
In cPanel go to File Manager, in the public_html folder, select all, compress.

Then it’s just a matter of downloading the zipped file.
Step 2: Export the Database.
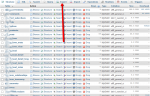
We need to log in to phpMyAdmin for this one. Once you are in phpMyAdmin, select your database from the databases on the left. Once you have the database tables visible, simply click the Export button at the top.

From the next screen you will need to complete the export, and download the file.

Now we have everything we need to move the site to the new host.
Step 3: Uploading the files
On the new server, you need to go back into file manager and upload the zip file you downloaded before. Then extract the zip file into the public_html folder.
Step 4: Create a new Database
On the new server, within cPanel, go to MySQL Databases and create a new database. Write down the database name.
Create a database user, write down this name and password too.
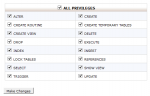
Add the database user to the database and give them all privileges.

Now we have a new database, new database user, new database password.
Step 5: Import Database
In just the same way we exported the database on the old host server, we now complete the import into the new database on the new host server.
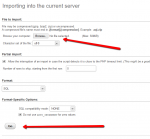
Go into phpMyAdmin on the new server, select your new database, click Import.
Simply browse for the SQL file you downloaded before, and import.

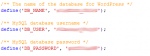
Step 6: Link new Database to WordPress.
There is one file that you need to edit to tell WordPress you now have a new database.
In file manager in cPanel (new server), click on wp-config.php and then edit, you will need to update the database name, username & password to be the ones you set up on the new server database when you created it.

Step 7: Update your Domain Name Servers
The last step is just that, head over to your registrar and update the DNS of your domain name to point to the new server.
Now once the DNS has propagated you will have your website on the new server.
Finishing Tip
As a note, you may want to log in to the old server website and make a post, or change some text on the old server AFTER you complete the move, but before you change the DNS to be able to tell when the DNS has changed over. I usually just add an extra word into the content or something similar.
Happy moving!
---
Moving WordPress from One Host to Another with cPanel Access
I often get asked this question, how can I move my WordPress website from one host to another?
Generally a cPanel transfer from the old host to the new host will work for you and you can contact your new host and ask them to help with that.
There are often reasons why that is not the best way to go. Are you wanting to move a site you have set up as an addon domain but want to leave the root site where it is? that’s just one reason you will need to do this manually. So here are some steps to help.
Today i’ll go through the steps for you if you DO have cPanel access to the old server. Later I will cover how to do the same without cPanel access the the old server.
Essentially it’s just a matter of backing everything up, and moving it. Sounds easy right? Well it’s easy when you know how.
Because you are not changing the URL there are no real changes you need to make to any settings before backing up.
Step 1: Back up the files.
In cPanel go to File Manager, in the public_html folder, select all, compress.
Then it’s just a matter of downloading the zipped file.
Step 2: Export the Database.
We need to log in to phpMyAdmin for this one. Once you are in phpMyAdmin, select your database from the databases on the left. Once you have the database tables visible, simply click the Export button at the top.
From the next screen you will need to complete the export, and download the file.
Now we have everything we need to move the site to the new host.
Step 3: Uploading the files
On the new server, you need to go back into file manager and upload the zip file you downloaded before. Then extract the zip file into the public_html folder.
Step 4: Create a new Database
On the new server, within cPanel, go to MySQL Databases and create a new database. Write down the database name.
Create a database user, write down this name and password too.
Add the database user to the database and give them all privileges.
Now we have a new database, new database user, new database password.
Step 5: Import Database
In just the same way we exported the database on the old host server, we now complete the import into the new database on the new host server.
Go into phpMyAdmin on the new server, select your new database, click Import.
Simply browse for the SQL file you downloaded before, and import.
Step 6: Link new Database to WordPress.
There is one file that you need to edit to tell WordPress you now have a new database.
In file manager in cPanel (new server), click on wp-config.php and then edit, you will need to update the database name, username & password to be the ones you set up on the new server database when you created it.
Step 7: Update your Domain Name Servers
The last step is just that, head over to your registrar and update the DNS of your domain name to point to the new server.
Now once the DNS has propagated you will have your website on the new server.
Finishing Tip
As a note, you may want to log in to the old server website and make a post, or change some text on the old server AFTER you complete the move, but before you change the DNS to be able to tell when the DNS has changed over. I usually just add an extra word into the content or something similar.
Happy moving!